使用鼠标或键盘标记图像数据

标记数据是一件麻烦事。然而,准确标记的数据是数据科学和机器学习的基础。那么,让我们看看如何使用
Python 加速这一过程。
我们将构建两种类型的记录标签器:
这些可用于直接在笔记本中标记图像。我们将讨论用于创建这些的代码,您也可以在
GitHub 上找到它。
首先,我们将使用下面的导入。我们有一些标准包(第 1-3
行)。我们有一些用于处理图像的包(第 4-8
行)。最后一个用于处理文件路径(第 9 行)。
1
2
3
4
5
6
7
8
9
| import numpy as np
import matplotlib
import matplotlib.pyplot as plt
import matplotlib.image as mpimg
plt.style.use('default')
matplotlib.use('TkAgg')
import cv2
import glob
|
我们将使用图像来训练一个模型,该模型可以引导自动驾驶汽车在赛道上行驶。你可以在数据集中找到这些示例。记下图像名称:
1
| 173_48_ffc63efc-40d3-11ed-81f8-a46bb6070c92.jpg
|
图片尺寸为 224 x 224。名称中的前两个数字是此图片中的 X 和 Y
坐标。我们希望使用图片作为输入来预测此坐标。
不清楚?让我们显示其中一张图片。这些图片存储在第 2
行的目录中。我们加载所有这些图片的路径(第 3 行)。
1
2
3
|
data = dp + 'JatRacer_Images/direction/'
img_path = glob.glob(data + '*.jpg')
|
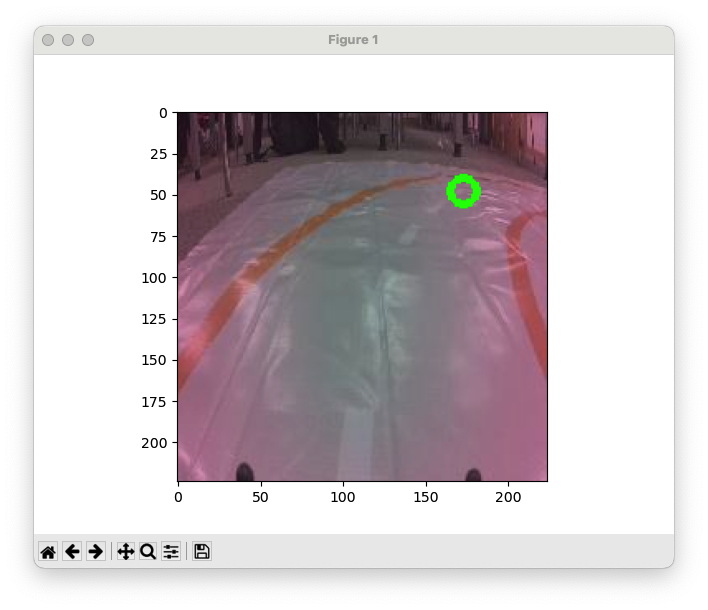
我们取列表中的第一个路径(第 1 行),并从图像路径中获取 X 和 Y
坐标(第 4-6 行)。然后,我们将图像与坐标一起显示(第 9-11
行)。具体来说,我们使用 cv2 函数在给定的坐标处绘制一个圆圈(第 10
行)。
1
2
3
4
5
6
7
8
9
10
11
| path = img_path[0]
name = path.split("/")[-1]
x = int(name.split("_")[0])
y = int(name.split("_")[1])
img = mpimg.imread(path).copy()
img = cv2.circle(img, (x, y), 8, (0, 255, 0), 3)
plt.imshow(img)
|
您可以在图 1
中看到输出。自动驾驶汽车正在右转。理想的方向是朝着绿色圆圈给出的坐标行驶。
假设你花了几个小时收集数据,却发现数据被错误标记(我们确实遇到过这种情况)。尝试手动更改文件名中的
x/y 坐标将是一场噩梦。相反,我们将使用 Python。
标签器 1:鼠标单击
图 2
显示了我们的第一个标签器的工作情况。当您单击图像时,它会保存到名为“relabelled”的文件夹中。图像名称会使用鼠标单击的坐标进行更新。您可以看到如何使用类似的标签器来记录图像中对象的位置。
要构建此标签机,我们首先要定义读取和写入路径。第一个是保存现有图像的位置(第
1 行)。第二个是保存更新图像的位置(第 2 行)。
1
2
| read_path = dp + "JatRacer_Images/direction/"
write_path = dp + "JatRacer_Images/relabelled/"
|
然后我们定义一个函数
onclick,当我们点击图像时,该函数将运行。它获取鼠标点击的坐标(第
6 行 - 第 7 行)。我们用这些坐标创建一个新名称(第 10 行 - 第 12
行),并用这个名称将图像保存在新位置(第 14 行)。
每次迭代后,都会清除绘图(第 17
行)。如果不这样做,您将遇到内存问题。然后,我们通过删除第一个实例(第
25 行)来更新路径列表,并显示列表中的下一个图像(第 25-29 行)。
1
2
3
4
5
6
7
8
9
10
11
12
13
14
15
16
17
18
19
20
21
22
23
24
25
26
27
28
29
| def onclick(event):
global img_path
global img
x = round(event.xdata)
y = round(event.ydata)
path = img_path[0]
name = path.split("/")[-1].split("_")[-1]
new_name = "{}_{}_{}".format(x,y,name)
mpimg.imsave(write_path + new_name, img)
plt.clf()
if len(img_path) > 0:
img_path = img_path[1:]
path = img_path[0]
img =mpimg.imread(path)
plt.imshow(img)
plt.show()
|
然后,您可以在下面看到我们如何使用这个函数。我们首先获取要重新标记的所有图像的路径(第
6 行)。我们加载第一张图像(第 9-10 行)并显示它(第 16-17
行)。重要的步骤是向图形添加点击功能(第 14 行)。为此,我们将
onclick 函数作为参数传递给 mpl_connect
函数。
1
2
3
4
5
6
7
8
9
10
11
12
13
14
15
16
17
| %matplotlib tk
global img_path
global img
img_path = glob.glob(read_path + "/*.jpg")
path = img_path[0]
img = mpimg.imread(path)
fig = plt.figure(figsize=(5,5))
cid = fig.canvas.mpl_connect('button_press_event', onclick)
plt.imshow(img)
plt.show()
|
另一件需要注意的事情是全局变量的使用(第 2-3 行)。这允许在
onclick 函数中更新这些变量。还有
%matplotlib tk(第 1
行)。这将在笔记本外的窗口中打开图形。
标签器 2:鼠标单击
现在,让我们给这个标签器添加一些趣味。在图 3
中,您可以看到我们在图像中添加了绿色圆圈。这些圆圈给出了先前标签的坐标。它们让我们看到哪些图像被错误地标记了。

代码与我们之前看到的类似。最重要的是,我们将保存的图像(第 9
行)必须与我们显示的图像(第 32
行)不同。否则,我们的图像上都会有明亮的绿色圆圈。不过,这会让模型更容易做出预测!
1
2
3
4
5
6
7
8
9
10
11
12
13
14
15
16
17
18
19
20
21
22
23
24
25
26
27
28
29
30
31
32
33
34
35
36
37
38
| def onclick(event):
global img_path
if event.xdata is not None and event.ydata is not None:
x = round(event.xdata)
y = round(event.ydata)
save_img = mpimg.imread(img_path[0])
path = img_path[0]
name = path.split("/")[-1].split("_")[-1]
new_name = "{}_{}_{}".format(x, y, name)
mpimg.imsave(write_path + new_name, save_img)
plt.clf()
if len(img_path) > 0:
img_path = img_path[1:]
path = img_path[0]
name = path.split("/")[-1]
x = int(name.split("_")[0])
y = int(name.split("_")[1])
img = mpimg.imread(path).copy()
img = cv2.circle(img, (x, y), 8, (0, 255, 0), 3)
plt.imshow(img)
plt.show()
else:
print("Invalid click, outside of image bounds.")
|
再次,我们以与以前相同的方式使用此函数。
1
2
3
4
5
6
7
8
9
10
11
12
13
14
15
16
17
18
19
20
21
22
23
|
%matplotlib tk
global img_path
global img
img_path = glob.glob(read_path + "/*.jpg")
path = img_path[0]
name = path.split("/")[-1]
x = int(name.split("_")[0])
y = int(name.split("_")[1])
img = mpimg.imread(path).copy()
img = cv2.circle(img, (x, y), 8, (0, 255, 0), 3)
fig = plt.figure(figsize=(5,5))
cid = fig.canvas.mpl_connect('button_press_event', onclick)
plt.imshow(img)
plt.show()
|
使用此标记器时,一个技巧是单击要从数据集中删除的图像的左上角。然后,您可以过滤掉所有
x < 5 和 y < 5 的图像。
贴标机 3:键盘按压
我们不用记录鼠标点击,而是使用键盘。如果你想对图像进行分组以完成分类任务,这尤其有用。
在我们的示例中,我们将图像分为左转和右转。每次我们点击
left(左)、right(右)或
d(删除)键时,下面的图像都会发生变化。我们还在左上角添加了一个数字。这让我们知道还有多少图像需要标记。
我们首先定义一个函数
onpress,该函数将在按下某个键时运行。我们获取该键(第 7
行),并使用图像名称作为 ID(第 10-11
行)。接下来发生什么取决于按下了哪个键:
- 如果我们没有点击有效键,则会显示错误消息(第 14-16 行)
left 我们将 ID 附加到 ID 列表中,“left”
附加到标签列表中right 我们附加 ID 和“right”d 我们不添加任何内容
图形被清除(第 27 行),我们更新图像(第 29-39
行)。我们将img_path列表的长度作为文本包含在左上角(第
36 行)。
即使按下“d”键,图像也会更新。在收集这些数据时,有时会有一只流浪的手挡道。现在我们可以轻松地从分类数据集中移除/删除这些杂乱的图像。
最后,我们将在下面看到如何使用此函数。我们将 ID
和标签列表定义为全局变量(第 3-6 行)。我们加载图像路径列表(第 9
行),并将第一幅图像加载为 matplotlib 图形(第 12-17
行)。与之前将按下功能添加到图形(第 20 行)类似。这次我们传入
key_press_event 和新函数 onpress
作为参数。
1
2
3
4
5
6
7
8
9
10
11
12
13
14
15
16
17
18
19
20
21
22
23
24
25
26
27
28
29
30
31
32
33
34
35
36
37
38
39
| def onpress(event):
global img_path
global IDs
global labels
key = event.key
print(key)
path = img_path[0]
ID = path.split("/")[-1]
if key not in ["left","right","d"]:
print("Invalid Key")
else:
if key == "left":
IDs.append(ID)
labels.append("left")
elif key == "right":
IDs.append(ID)
labels.append("right")
plt.clf()
if len(img_path) > 0:
img_path = img_path[1:]
path = img_path[0]
img = mpimg.imread(path)
plt.text(0, 15, len(img_path),color='r',size=20)
plt.imshow(img)
plt.show()
|
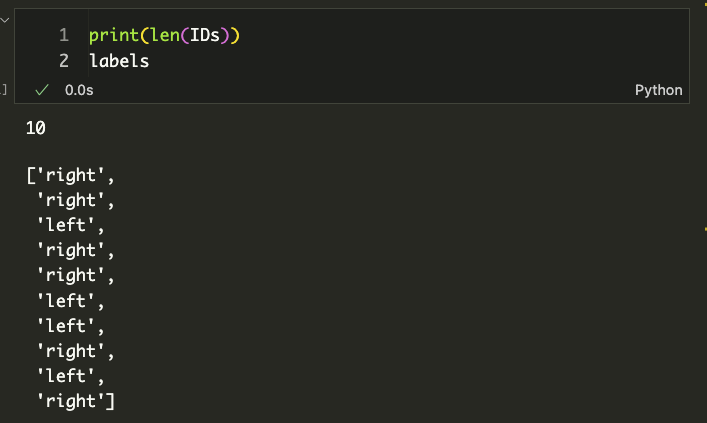
完成所有图像的标记后,您将获得以下类似的列表。对于您的任务,我强烈建议将它们保存为
csv。您不想再做所有这些标记!
参考